Click checkboxes to manually select records from a list.
The ability to manually select individual records for filtering is useful and often necessary, but is not as straight forward as you might think.
Your first thought may be to create a field in the table to act as a flag and place it on a list layout as a checkbox allowing users to check the records they want. The problem with this is that when one user selects a checkbox, that record is flagged for all users. So, if you have more than one user wishing to select different records, their selections will interfere with one another.
With a global field, however, the value of the field is session-based: meaning what one user does will not affect other users. But, how do you use a global field, which by definition allows only one value per table, to allow you to select multiple records? With the technique explained below, we will do just that.
Quick Overview
There are four basic steps which are outlined in detail below.
- Create a global field to hold a list of selected IDs.
- Created layered layout objects for the checkbox and use conditional formatting to show or hide the checkbox based on whether the current record’s ID exists in the global field.
- Define a button on the layered layout objects that toggles the checkbox by adding or removing the current record’s ID to or from the list in the global field.
- Create a filter button, “Show Selected,” that either goes to related records based on a relationship built with the global field, or run a find script that loops through the IDs in the global field and finds each record.
See the details of each of these steps below as well as some alternative methods and enhancements.
Step 1 – Create a Global Field
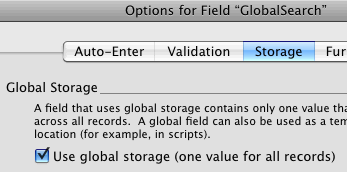
Create a text field in any table. In the field options, set the new field to use global storage as shown in the figure below. The purpose of this field is to hold a list of primary keys of the selected records.

Under the storage tab in the field options, select the “Use global storage (one value for all records)” check box.
Note: This technique could also be performed with a global variable rather than a global field. In this way, no database definition changes would be necessary. However, you would not be able to use the global variable in relationships. So, in Step 4 below, you will need to choose the script option..
Step 2 – Add the Checkbox to the Layout
This is a little bit more complex than it sounds, and there are a number of ways to approach this. The approach we’ll take is to use conditional formatting to show or hide a checkbox based on whether the current record is in the list of selected records. The method I outline here layers a couple of layout objects on top of one another. For a simpler option, see the note at the bottom of this step.
Step 2a – Place a checkbox image on the layout. This could be an image with a checkmark, an X, or you could simply use a text object with an X or √ character. Use the “engraved” effect and give it a border if you wish.

Step 2b – Place a text object or button with nothing but a single space character over the image. Make the object slightly smaller vertically and horizontally than the object from 2a and center it vertically and horizontally such that it covers the whole object except the border and/or engrave effect. Format the object to have a clear background with no border.
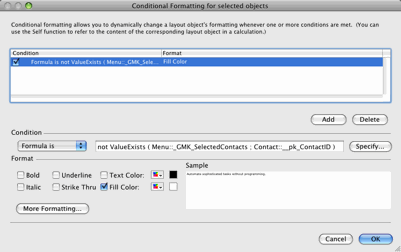
Step 2c – Set conditional formatting for the item in 2b with the following formula:
not ValueCount ( FilterValues ( Globals::SelectedItems ; Table::RecordID ) ) > 0
Replace Globals::SelectedItems with the name of the global field you created in Step 1.
Replace Table::RecordID primary key from the table from which you will be selecting records.
For the conditional format, set the background color to be the same as the background color on your layout.

Conditional formatting for the object layered on top of the checkbox.
The result of this step is that when the primary key of the current record exists in the list of keys in the global field, the checkbox image will be hidden, making it appear “unchecked”.
Step 3 – Create the Button
Define a button for the object you created in 2b above. The button simply needs to perform a Set Field step to either add or remove the ID of the current record to or from the global field.
The target field will be the field you created in Step 1.
The calculation will be as follows:
Case (
 ValueCount ( FilterValues ( Globals::SelectedItems ; Table::RecordID ) ) > 0;
  Substitute ( Globals::SelectedItems ; Table::RecordID & ¶ ; "" ) ;
  Globals::SelectedItems & Table::RecordID & ¶
)
Replace Globals::SelectedItems with the name of the global field you created in Step 1.
Replace Table::RecordID primary key from the table from which you will be selecting records.
Step 4 – Filter Button
Now you will want to have a way to find all of that user’s checked records. We’ll look at two approaches. One uses a find script; the other uses a relationship.
Option 1 – The Script Method – Create a script that enters find mode, loops through all the IDs in the global field and creates a find request for each. The script would look something like this:
Enter Find Mode[]
Set Variable [$i;1]
Loop
  Set Field[ Table::RecordID ; GetValue ( Globals::SelectedItems ; $i ) ]
  Set Variable [ $i ; $i+1 ]
  Exit Loop If [ $i > ValueCount ( Globals::SelectedItems ) ]
  New Record/Request[]
End Loop
Perform Find[]
Option 2 – The Relationship Method – Create a relationship to the table with records being selected based on the global field = record id. Then create a button that runs the script step Go To Related Record.
… And You’re Done
Enhancements
User-based rather than session-based
The method above will cause all selections to be cleared whenever the database is closed. You may want to set this up to be persistent across a user’s sessions. In other words, if a user logs out, then logs back in later, you may want their selections to remain. There are three possible options.
Option 1 – Instead of using a global field, use a non-global text field in the table you are filtering. Instead of storing a list of IDs in the field, store a list of account names. When the checkbox is clicked, add or remove the current account name to or from the list. When searching for selected records, do a simple find on the current account name in that field. One drawback to this method is that it will trigger any modification date/time/user fields to be updated which may not be desirable for auditing purposes.
Option 2 requires that your database be set up with a user table and a way to access the current user’s records from the current context. Then, instead of using a global field as created in Step 1 above, you will use a field in the user table in a similar manner.
Option 3 – Run a script on exit that saves the contents of the global field along with the current account name to a record in a table you create to store such things. Then upon opening or logging in, a script will run to search for a record in that table with the current account name and repopulate the global field with the contents of the record you populated on exit.
Select All and Select None buttons
For Select All, create a script that loops through each record in the current found set and adds the ID and a carriage return (¶) to the global field if it didn’t already exist.
For Select None, simply clear the global field:
Set Field [ Globals::SelectedItems ; "" ]
That’s all!
As always, if you have any questions or comments feel free to post a comment below or contact me directly.

19 Comments