


With a FileMaker Pro Web Viewer and some JavaScript, we can create a FileMaker Pro native internal instant messaging system that updates every second: no plugins, no distracting refreshes, no affect on performance and no internet access required.
This article follows up on 2 previous articles discussing dynamic multi-threading with web viewers: Timers and Alarm Clocks. I recommend that you read those articles first if you have not already, especially the first one on Timers, as it covers the basics of this technique using web viewers, URIs and JavaScript.
The Basics
In the Timer article, I discuss the three main components that are the foundation of this technique: data URIs, including FileMaker Pro data in a web viewer and JavaScript. Click here to view the basics of this technique of dynamic multi-threading with web viewers.
In short, we will use a Data URI to specify the HTML and JavaScript we want to display in the web viewer, and we’ll include data from our FileMaker Pro database in that code. We will use JavaScript to build and refresh the HTML dynamically.
The Instant Messenger Project
I also recommend that you skim through the entire article before beginning so you know what you’re getting into and can plan accordingly.
Step 1 – Create Messenger Table
In this step, we create a simple table in our FileMaker Pro database that stores our messenger communications.
Our Messenger table will have the following fields:
__pk_MessengerID – Number – Auto enter Serial. This is the primary key of the table. Though we don’t actually use this field for any relationships or other functionality, it is always good practice to include a primary key field in every table that you create. This way, if you ever need to isolate a record it in a relationship or script, you will have a way.
_fk_Username~from – Text. This holds the user account name of the logged in user who sent the message.
_fk_Username~to – Text. This holds the user account name of the message recipient.
_fmk_Usernames – Calculation (Text). This field is used for relationships and holds the values of both of the above usernames in a list. The calculation is as follows:
_fk_Username~from & ¶ & _fk_Username~to
Message – Text. The text of the message.
Status – Text. This field will be used to flag the message as “New” or “Read”. You could simply use a number field as a flag (with values 1 or 0), but I like using the text field to allow for future expansion.
IsNew – Calculation (Number). This field will be one if Status=”New”. It is used for relationships so FileMaker knows when you have received new messages. If you choose, as mentioned above, you could simply combine this field with the Status field. The calculation is simply as follows:
Status = "New"
Timestamp – Timestamp – Auto-Enter Creation Date. This is the time that the message was sent.
Step 2 – The User Table
The basic messenger functionality could work without a user table; however, this table allows us to add a number of features such as status updates, a dynamic pop-up lists of users we can chat with and a list of user from whom we have received new messages.
The user table will hold information about each user who can log in to the database and use the chat functionality.
Our User table will have the following fields:
Username – Text. This will essentially be the primary key of the user table record. It holds the FileMaker account name of the user.
MessengerStatus – Text. This field holds the status of the user. We will set this in our open script and log in script (if one exists), as well as our close and log out scripts.
MessengerDisplay – Calculation (Text). We’ll use this one in a value list of users and their statuses. The calculation is as follows:
If ( not IsEmpty ( Username ) ;
 Username & " (" & If ( not IsEmpty ( MessengerStatus ) ; MessengerStatus ; "Status Unknown" ) & ")"
)
Step 3 -The Globals Table
You will need four global fields. Theoretically, you could put them in any table since they are global, but I strongly recommend that you put these in a table designated to hold only global variables.
_gk_Username – Text (global). This will hold the user account name of the currently logged in user. In your open script and log in script (if you have one), this field should be set with the get function: get ( AccountName ).
_gk_ChatUsername – Text (global). This is the user with whom the current user is currently chatting.
gc_1 – Calculation(Number). Simply holds the number 1 for relationship purposes. In the calculation field, simply enter “1” (without quotes). Note that this field should not be set to global.
MessengerText – Text (global). This field is used for entry of the text message before it gets sent to the recipient.
Once this table is created, you will need to create a new record in the table.
Step 4 – Relationships

In it’s simplest form, this is how your relationship graph will look.
There will be 4 occurrences of the Messenger table with three of them related to your global table (or some other table based on global fields). There will also be two occurrences of the User table related to the global table.
Create a relationship occurrence of the Messenger table called Messenger~new. This relationship will give us a list of messages sent to the current logged in user that have not yet been read. It is a multi-predicate relationship (2 to be exact) based on the following two pairs of fields:
Globals::_gk_Username = Messenger~new::_fk_Username~to
Globals::gc_1 = Messenger~new::IsNew
Create another relationship occurrence of the Messenger table called Messenger~activechat. This will give us a list of all the message interactions between the current logged in user and the user with whom the current user is chatting. It is another 2 predicate relationship based on the following two pairs of fields:
Globals::_gk_Username = Messenger~activechat::_fmk_Usernames
Globals::_gk_ChatUsername = Messenger~activechat::_fmk_Usernames
Finally, create one more relationship occurrence of the Messenger table called Messenger~activereceived. This will give us a list of all the messages to the current logged in user from the user with whom the current user is chatting. We will use this to mark messages as read. It is another multi-predicate relationship based on the following two pairs of fields:
Globals::_gk_Username = Messenger~activereceived::_fk_Username~to
Globals::_gk_ChatUsername = Messenger~activereceived::_fk_Username~from
Now we can set up the User table relationships:
Create a relationship between the globals table and an occurrence of the User table called User~loggedin.
Globals::_gk_Username = User~loggedin::Username
Create a relationship between the globals table and an occurrence of the User table called User~other.
Globals::_gk_Username ≠ User~other::Username
Note the not equal operator above.
Optionally, you can create a relationship between the Messenger~new table and an occurrence of the User table in order to produce a list of users from whom the current user has received new messages. We can call the new User table occurrence Messenger~new_User~from (or whatever your conventions suggest). That relationship will be based on the following:
Messenger~new::_fk_Username~from = Messenger~new_User~from::Username
Step 5 – Create Layouts
Chat Window Layout
We create this layout to be used as a chat window.
Our layout has three fields, four buttons, a portal (optional) and two web viewers. The context of the layout is our Globals table. We’ll give it the name “Messenger.”
The 3 fields:
User~loggedin::MessengerStatus – In the upper left under the label, “Your Status”, is the MessengerStatus field from the User table. It is a popup menu with a value list that has a few suggested status messages: Logged In, Busy, Away, etc. And selected “Allow entry of other values.”
Globals::_GK_ChatUsername – This field is placed to the right of the text, “Chatting with.” It is using a popup window using a value list (see below) defined to use values from Globals_User~other::Username, also displaying values from Globals_User~other::MessengerDisplay, include only related records from Globals and show only values from the second field.
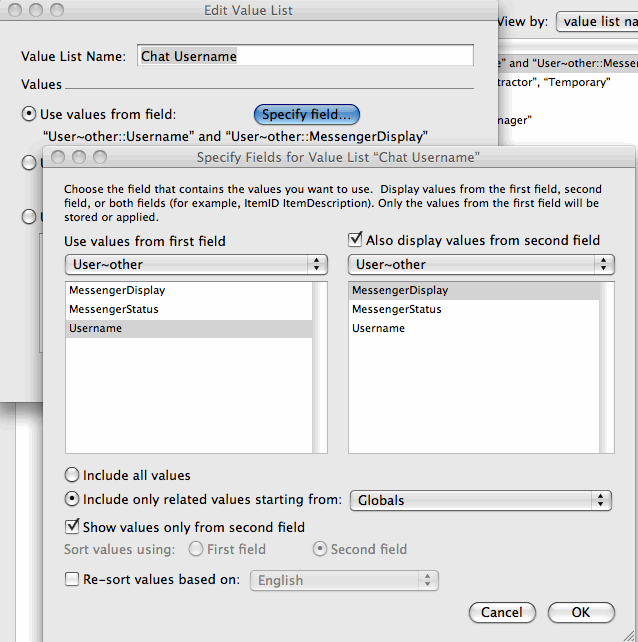
Define a value list for the Globals::_GK_ChatUsername field as shown above.
Globals::MessengerText – This is the large text field near the bottom, to the left of the “Send” button. This is where users will type their message.
The Portal (Optional)
Under the yellow “Messenger/2 New Messages” box (which is flashing, btw), there is a portal showing related records from Messenger~new_User~from. The portal has a text object (just text, not a field) with the following text containing a merge field:
New Msg From <<Messenger~new_User~from::Username>>
Tip: In order to get all that text to fit inside that small space, you can shrink the font inside the merge field without affecting how it will display. The font size displayed will be that of the first ‘<‘ character and the last ‘>’. For example:
New Msg From <<Messenger~new_User~from::Username>>
Also, as long as the upper left corner of the text object is within the bounds of the first portal row, it will display properly. However, if the text wraps or overflows, it may end up overlapping text in the other portal rows.
4 Buttons and 2 Web Viewers
These are covered in the steps 4 and 6. BTW: in case you’re wondering where the third and fourth buttons are, one is the web viewer displaying “Messenger / 2 New Messages,” the other in the text object in the portal.
Dev – Messenger Layout
Create a layout showing records from the Messenger table. The layout can be blank. It’s only purpose is for scripting. Call the layout “Dev – Messenger.”
Step 6 – Web Viewer Setup
We’ll be setting up two web viewers. One, we’ll call the messenger widget, the other is the conversation viewer.
The Messenger Widget
Create a web viewer sized 116×40 (you can do any size, but the HTML code below is optimized for this size).
The widget shows the current status or the logged in user or flashes the count of incoming messages.
We can place this widget on any layout with the appropriate context and the user will be alerted to incoming messages.
In the web viewer setup dialog, deselect all of the check-boxes near the bottom of the dialog. For the web address, use the following code:
"data:text/html,<html>
<head>
<script type='text/javascript'>

/*Variables set with FileMaker Pro data*/
var msgCount = '" & Count ( Messenger~new::__pk_MessengerID ) & "';
var recentMsgTimeTxt = '" & Max ( Messenger~new::Timestamp ) & "';
var status = '" & User~loggedin::MessengerStatus & "';
/*End FileMaker Pro Data*/

var recentMsgTime = new Date(recentMsgTimeTxt);

function setMsg()
{
	var currentTime = new Date();
	var msgobj = document.getElementById('msg');

	if(msgCount>0 && Math.floor(currentTime/1000)%2==0 )
	{
		document.body.style.backgroundColor='#FFFF00';
		msgobj.innerHTML=msgCount + ' New Message';

		if ( msgCount > 1 ) msgobj.innerHTML=msgobj.innerHTML + 's';
		msgobj.style.fontWeight='bold';

	}
	else
	{
		document.body.style.backgroundColor='#FFFFFF';
		msgobj.style.fontWeight='normal';
	}
	if(msgCount==0)
	{
		msgobj.innerHTML=status;
	}

	setTimeout('setMsg();',1000);
}

</script>
</head>
<body style='margin:4px;padding:0;font-size:11px;font-weight:normal;font-family: Arial, Helvetica, sans-serif;text-align:center;background-color:#FFFFFF;' onload='setMsg();'>
<div style='font-size:10px;font-weight:bold;padding-bottom:3px;'>Messenger</div>
<div id='msg'></div>
</body></html>"
As with the other projects, don’t worry too much about understanding all of the code above. It will work even if you don’t fully understand. The main thing to note is the series of var statements near the top. These are setting JavaScript variables with FileMaker data fields which are later used in the JavaScript function.
var msgCount = '" & Count ( Messenger~new::__pk_MessengerID ) & "';
var recentMsgTimeTxt = '" & Max ( Messenger~new::Timestamp ) & "';
var status = '" & User~loggedin::MessengerStatus & "';
If your field and/or table occurrence are named differently, you will need to adjust these lines accordingly.
The Conversation Viewer
This is the larger web viewer in the messenger window which shows the messages. When new messages appear, the messages is added to the bottom, highlighted, and the viewer automatically jumps to the bottom.
You can size this web viewer to your tastes. In the screenshot above, it is 440×220 and anchored on all four sides such that if the window is re-sized, the viewer will stretch or shrink to fill the space.
In the web viewer setup, select “Allow interaction with web viewer content.” Deselect all other check-boxes. For the web address, use the following code:
"data:text/html,<html>
<head>
<script type='text/javascript'>
/*Variables set with FileMaker Data*/
var msgtxt = new Array ( '" & Substitute ( Substitute ( List ( Messenger~activechat::Message ) ; "'" ; "'" ); ¶ ; "','" ) & "');
var msgtime = new Array ( '" & Substitute ( List ( Messenger~activechat::Timestamp ) ; ¶ ; "','" ) & "');
var msguser = new Array ( '" & Substitute ( List ( Messenger~activechat::_fk_Username~from ) ; ¶ ; "','" ) & "');
var msgstatus = new Array ( '" & Substitute ( List ( Messenger~activechat::Status ) ; ¶ ; "','" ) & "');
var thisuser = '" & GLobals::_GK_Username & "';
/*End FileMaker Data*/
function setMsg(newmsg)
{
var currentTime = new Date();
var msgobj = document.getElementById('msg');
var labelobj = document.getElementById('label');
var content = '';
msgobj.innerHTML = '';
for ( var i=0; i< msgtxt.length ; i++ )
{
if (msgtxt[i]!='')
{
content=\"<span style='font-weight:bold;'>[\" + msgtime[i] + '] ';
if ( thisuser.toLowerCase()==msguser[i].toLowerCase() ) content +='you';
else content +=msguser[i];
content += \" said:</span> <span style=''>\" + msgtxt[i] + '</span>';
var pstyle='';
if ( msgstatus[i]=='New' && msguser[i].toLowerCase()==thisuser.toLowerCase())
{
pstyle='background: #ffffcc;';
}
else if ( msgstatus[i]=='New' && msguser[i].toLowerCase()!=thisuser.toLowerCase())
{
pstyle='background: #ccccff;';
newmsg=true;
}
msgobj.innerHTML += \"<p style='\" + pstyle + \"'>\" + content + '</p>';
}
}
dh=document.body.scrollHeight;
ch=document.body.clientHeight;
if(newmsg && dh>ch)
{
bottom=dh-ch;
window.scrollTo(0,bottom);
}
setTimeout('setMsg(false);',1000);
}
</script>
</head>
<body style='margin:4px;padding:0;font-size:11px;font-weight:normal;font-family: Arial, Helvetica, sans-serif;text-align:left;background-color:#FFFFFF;' onload='setMsg(true);'>
<div id='label' style='font-size:10px;font-weight:bold;padding-bottom:3px;'></div>
<div id='msg'>Loading...</div>
</body></html>"
Again, don’t worry too much about understanding all of this. The var statements setting JavaScript variables with FileMaker data are as follows:
var msgtxt = new Array ( '" & Substitute ( Substitute ( List ( Messenger~activechat::Message ) ; "'" ; "'" ); ¶ ; "','" ) & "');
var msgtime = new Array ( '" & Substitute ( List ( Messenger~activechat::Timestamp ) ; ¶ ; "','" ) & "');
var msguser = new Array ( '" & Substitute ( List ( Messenger~activechat::_fk_Username~from ) ; ¶ ; "','" ) & "');
var msgstatus = new Array ( '" & Substitute ( List ( Messenger~activechat::Status ) ; ¶ ; "','" ) & "');
var thisuser = '" & Globals::_GK_Username & "';
Most of these are producing FileMaker lists and converting them to JavaScript arrays.
Step 7 – Scripting
We will be creating four scripts!
- Mark As Read – Marks incoming messages in the active conversation as “Read.”
- Send Message – Creates a new message record with the text typed in the MessengerText field, clears that field and refocuses on that field.
- Go To Messenger – Opens the messenger layout in a new window (selects existing window if already open). If there are unread messages, selects a user from whom messages were received to display the new message(s) and marks as read.
- Trigger – Message Keystroke – Called on each keystroke in the MessengerText field, this simple script checks the character code. If the return key was pressed, it sends the message.
Mark As Read
The Mark As Read script simply sets all the related Messenger~activereceived records to “Read.” It uses the Install OnTimer Script to add a 1 second delay so the new messages will remain highlighted for a second.
Send Message
This script opens a hidden window, creates a new messenger record, then populates the record with values from our global fields, including the messenger text. It then closes the window, clears out the messenger text, calls a script to mark incoming messages as read, then returns the focus to the MessengerText field.
Go To Messenger
This is the script that opens the messenger window, activates a chat of unread messages if one exists, and marks as read. We will be calling it from the messenger widget.
Trigger – Message Keystroke
This script every time a key is pressed on the keyboard while in the MessageText field. It will ignore every keystroke except the return key (you could also include the enter key on the keypad by adding Code ( Get(TriggerKeystroke) ) =10 )
Step 8 – Buttons and Script Triggers
Now, we’re going to set up buttons and triggers using the scripts we created in the previous step.
The Four Buttons
The Messenger Widget – On the messenger layout, you will define a button for the messenger widget web viewer (the smaller web viewer on the left). Right click on the web viewer and select “Button Setup…”.
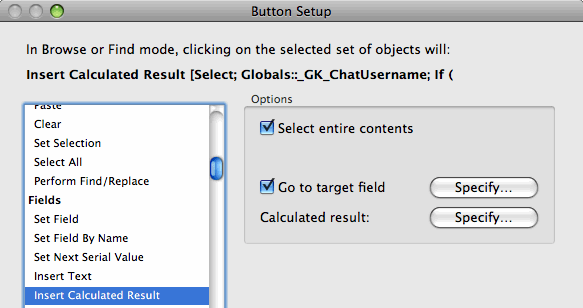
Button definition for The Messenger Widget.
In the Button Setup window, choose Insert Calculated Result. Click the Specify button to the right of “Go to target field” and select the field Globals::_gk_ChatUsername. Click the Specify button to the right of “Calculated result:” and enter the following:
If (
	not IsEmpty ( Messenger~new::_fk_Username~from ) ;
	Messenger~new::_fk_Username~from ;
	Globals::_GK_ChatUsername
)
This will set the active chat to the sender of a new message if one exists which effectively triggers the Mark As Read script (we’ll set that trigger up in a bit).
When including the Messenger Widget on other layouts in your solution, set the button to call the Go To Messenger script.

Button definition for The Messenger Widget on other layouts within your solution.
The portal text object – This is the text object you placed in the portal under The Messenger Widget. Set the button to perform a similar Insert Calculated Result operation as The Messenger Widget. The difference is that it will specify the from user based on which portal row was clicked. So, if there is more than one sender, the user can choose the sender to read next. The result calculation is as follows:
Messenger~new_Employee~from::UserName
The Send button – This button performs the script, Send Message. It provides a second way to send a message besides pressing return.
The Close button – Simply closes the window.
Script Triggers
_gk_ChatUsername field – This is the drop down menu to the right of the text, “Chatting with.” As suggested above, we set a script trigger on this field to trigger OnObjectModify which calls the script Mark As Read.
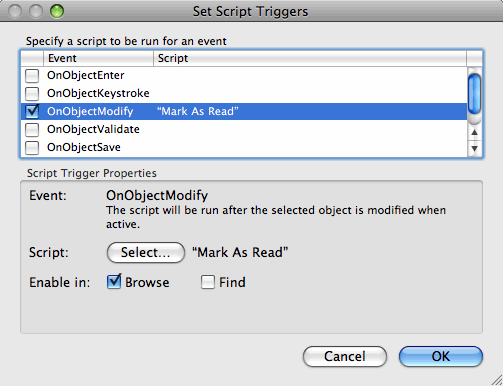
Script trigger for the “Chatting with …” drop down menu.
MessengerText field – We set a script trigger on this field OnObjectKeystroke which calls Trigger – Message Keystroke.
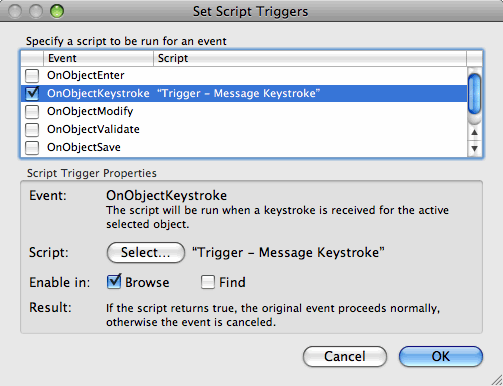
Script trigger for messenger text field.
Step 9 – Final File Setup
Now that we have the instant messaging structure in place, we need to prepare our file.
Open/Login Script
Create an open script if you do not already have one. This is a script that runs when the file opens. If you already have one, simply add the following two script steps to the file. If you do not already have one, create a new script, give it any name (perhaps “On Open”), and add the following steps:
If you have a login script, add the same two steps. If you don’t have one, don’t worry about it right now.
Close/Logout Script
Create an close script if you do not already have one. This is a script that runs when the file closes. If you already have one, simply add the following script step to the file. If you do not have one, create a new script, give it any name (perhaps “On Close”), and add the following step:
Set Field [ User~loggedin::MessengerStatus; “Logged Out” ]
If you have a logout script, add the same step. If you don’t have one, don’t worry about it right now.
Users and Accounts
Using FileMaker’s Manage Security feature, create an account for each user who will be using the messenger program (if such accounts do not already exist). Each user will have to log in using a different user account.
Then create a record in the user table for each user account. Be sure the usernames match. Alternatively, you can simply set up the relationship between Globals and User to allow creation of records in the User~loggedin table via this relationship. By doing this, the User record will be created automatically by the startup/login script when the user logs in.
File Options
Set up your file options to match the following:
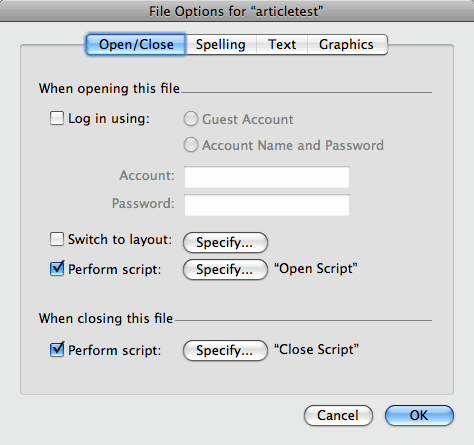
File Options for the messenger file. Deselect “Log in using:”, and designate the appropriate scripts for open and close.
If your file previously logged in automatically to the default admin account, be sure you know the account name and password for and admin account.
Done!
And now we’re ready to chat! (After some testing and debugging perhaps 😉 )
What Else Is Possible?
With these three projects, we’re still just scratching the surface of possibilities with this technique. With the power of HTML and JavaScript, the possibilities are practically infinite: message tickers; powerful, flexible and interactive reporting; calendar alerts; the list goes on….
Think about it for a minute. What comes to your mind? Please share your ideas below!
Debugging
Take a look at the debugging section of the Timer article where I discuss debugging web viewers with data URIs. Some additional things you can do with this project include adding fields to your Dev – Messenger layout and viewing the data that is being generated in the Messenger table. This project is also heavy on the scripting, so the Script Debugger will be quite useful.
And of course, if you are still stuck or you have any questions or comments, feel free to post a comment below or contact me directly.
14 Comments