With a FileMaker Pro Web Viewer and a little bit of JavaScript code, you can create a FileMaker Pro native alarm clock that updates every second: no plugins, no distracting refreshes and no affect on performance.
This article follows up on the previous article, Countdown Timers – Dynamic Multi-Threading with Web Viewers. I recommend that you read that article first if you have not already, as it covers the basics of how this technique works.
We’ll cover another simple example of what can be done using Web Viewers, and we’re still just scratching the surface of what can be done. For instance, in the next article, we’ll discuss creation of an interactive, internal instant messaging program with nothing but FileMaker Pro and web viewers: no plugins and no external internet access required.
To see this technique in action, download the “Free Contact Manager Database” using the form in the sidebar or by visiting the Inspired Business Suite webpage. The contact manager has the countdown timer, the alarm clock and several other techniques discussed in previous articles. It is open for examination, modification, copying, etc. (If you are already a member of the Inspired FileMaker Business e-newsletter, check your email for a link to the new contact manager.)
The Basics
In the previous article, I discuss the three main concepts that are the foundation of this technique: data URIs, including FileMaker Pro data in a web viewer and JavaScript. Click here to view the basics of this technique of dynamic multi-threading with web viewers.
In short, we will use a Data URI to specify the HTML and JavaScript we want to display in the web viewer, and we’ll include data from our FileMaker Pro database in that code. We will use JavaScript to build and refresh the HTML dynamically.
The Alarm Clock Project
Step 1 – Create Alarm Table
In this step, we create a simple table in our FileMaker Pro database that stores our alarm clock parameters. This table is very similar to the one created for the Countdown Timer. And similarly, there are a number of ways this could be set up depending on how you want to use the alarm clock. For instance, for this example, we will set it up so there is one alarm per user. In this way, if a user closes the database and opens it again (whether on the same workstation or a different workstation), their alarm clock setting will persist. Alternatively, the alarm clock could be workstation based, function based or session based. You may also choose to allow a user to set multiple alarms at one time.
For the user-based alarm clock, our table will have the following fields:
__pk_AlarmID – Number – Auto enter Serial. This is the primary key of the table. Though we don’t actually use this field for any relationships or other functionality, it is always good practice to include a primary key field in every table that you create. This way, if you ever need to isolate a record it in a relationship or script, you will have a way.
_fk_User – Text. In my database, this is the id of a record in the User table that corresponds to the currently logged in user. However, if such a table does not exist in your database, it could simply be the account name of the currently logged in user.
Label – Text. This field is optional and allows one to give the alarm a label. For instance, if you want to remember to eat lunch at 12:30PM, set the label to “Eat Lunch,” and when the alarm goes off, it will flash, “Eat Lunch.” This is especially useful if you set it up to allow multiple simultaneous alarms.
AcknowledgeTimeStamp – Timestamp. This field will be used to flag the alarm clock as “Acknowledged” so it stops flashing and beeping. We use a timestamp so that we know when the alarm was acknowledged, so for daily alarms, the alarm will go off at the next appropriate time.
Hour – Number – Restricted to 1-12 (12 hour clock). This is a data entry field where the user enters the hour the alarm clock should go off.
Minute – Number – Restricted to 0-59. Another data entry field for entering the minute.
AMPM – Text – Restricted to value list containing values AM and PM.
Date – take a guess. Another data entry field for entering the date of the alarm or left blank for a daily alarm.
Timestamp – Calculation (Timestamp). This is the time that the alarm will go off. The calculation is built from the data entry fields above. Here it is:
If ( IsEmpty ( Date ) ;
 Let (
   theTime = Get ( CurrentDate ) & " " & Hour & ":" & Minute & " " & AMPM ;
   If ( AcknowledgeTimeStamp ≥ GetAsTimestamp ( theTime ) ;
     ( Get ( CurrentDate ) + 1 ) & " " & Hour & ":" & Minute & " " & AMPM ;
     theTime
   )
 ) ;
 Date & " " & Hour & ":" & Minute & " " & AMPM
)
This calculation allows for daily alarms where no date is specified. Once the alarm for one date is acknowledged, it is ready for the next day.
Step 2 – Relationships
The relationship setup is nearly identical to that in the Timer. Only one relationship is needed and there are two possible ways to handle it:
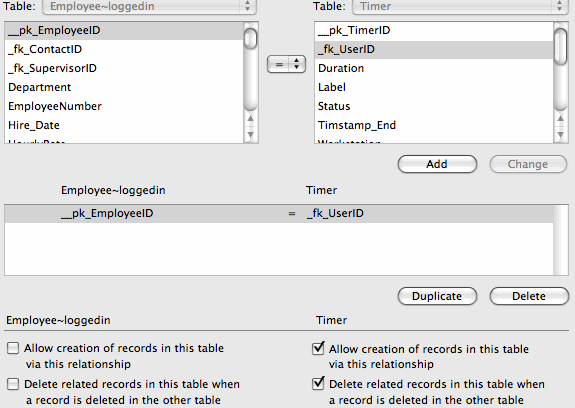
- If you have a user table, such as I do in my database, create a relationship between the Alarm table and the table occurrence of the User table that represents the currently logged-in user. The relationship will be based on this: Alarm ::_fk_User = User::__pk_UserID (__pk_EmployeeID in my case).
- If no user table and current user occurrence exists, simply create a global field in one of your tables (preferably a Globals table) that gets set upon log in to the current account user name. Then create a relationship between that table and the Alarm table using your global account name field = Alarm::_fk_User field.
In order to keep the scripting simple, select the check box to allow creation via this relationship:

Select "allow creation of records in this table via this relationship" to simplify the scripting process.
Step 3 – Web Viewer Setup
Create a web viewer sized 230×25 (you can do any size, but the HTML code below is optimized for this size).
The Alarm Clock.
For the web address, use the following code:
"data:text/html,<html>
<head>
<script type='text/javascript'>

/*Setting JavaScript Variables to value of FileMaker fields*/
var alarmTimeTxt = '" & Alarm::Timestamp & "';
var acknowledgeTimeTxt = '" & Alarm::AcknowledgeTimeStamp & "';
var alarmLabel = '" & Alarm::Label & "';
/*End FileMaker Fields*/

if (alarmLabel=='') alarmLabel='Alarm';
var alarmTime = new Date(alarmTimeTxt);
var acknowledgeTime = new Date(acknowledgeTimeTxt);

function setClock()
{
	var currentTime = new Date();
	var clock = document.getElementById('clock');

	if (alarmTimeTxt=='' || alarmTime >= currentTime || (acknowledgeTimeTxt !='' && acknowledgeTime >= alarmTime) || Math.floor(currentTime/1000)%2==0 )
	{
		document.body.style.backgroundColor='#FFFFFF';
		clock.innerHTML=currentTime.toLocaleDateString() + ' ' + currentTime.toLocaleTimeString();
	}
	else
	{
		document.body.style.backgroundColor='#FFFF00';
		clock.innerHTML=alarmLabel + \"<embed src='file:///System/Library/Sounds/Glass.aiff' autostart='true'  id='sound1'
enablejavascript='true' width='0' height='0'>\";
	}

	setTimeout('setClock();',1000);
}

</script>
</head>
<body style='margin:4px;padding:0;font-size:14px;font-weight:bold;font-family: Arial, Helvetica, sans-serif;text-align:center;background-color:#FFFFFF;' onload='setClock();'>
<p id='clock'>
</p>
</body></html>"
It’s not necessary for you to understand all of this code in order for you to get this to work. However, near the top, there are a series of var statements. These are setting JavaScript variables which are later used in the JavaScript function. Many of these variables are being set with FileMaker Pro data. For instance,
var alarmTimeTxt = '" & Alarm::Timestamp & "';
var acknowledgeTimeTxt = '" & Alarm::AcknowledgeTimeStamp & "';
var alarmLabel = '" & Alarm::Label & "';
If your field and/or table occurrence are named differently, you will need to adjust these lines accordingly.
Also, take note of the following JavaScript code:
clock.innerHTML=alarmLabel + \"<embed src='file:///System/Library/Sounds/Glass.aiff' autostart='true'  id='sound1'
enablejavascript='true' width='0' height='0'>\";
This specifies the sound that will be used when the timer goes off. The file URL after the scr= statement is the path on a Macintosh workstation to the Glass.aiff sound effect file. If you are using Windows, this path will have to be adjusted. If you are in a mixed environment, you may want to use a sound file that is located on the web.
Step 4 – Create Settings Layout

Create a layout for use as a popup window where the alarm can be set.
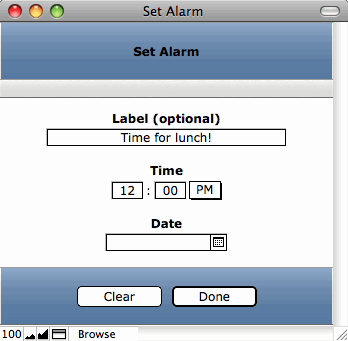
Create a layout that shows records from your Alarm table. As in the the screen shot above, include the label field, hour, minute, AMPM (with a value list with values AM and PM), and date.
The Clear button runs a script that simply runs a series of Set Field steps to clear the date from the Date, Hour, Minute, AMPM, AcknowledgeTimeStamp and Label fields, followed by a Commit Records step.
The Done button simply closes the window.
Step 5 – Scripting
We will be creating one script that will fire when clicking on the timer web viewer. Depending on the state of the alarm, it will perform one of two tasks:
- When the alarm is going off, it will set the “AcknowledgeTimeStamp” field, thus stopping the alarm.
- When the alarm is idle, it will bring up the alarm settings layout in a popup window.
Here are the script steps:
Finally, define a button for the web viewer that calls the script you just created.
That’s it. The timer should now work for you. If it doesn’t (as most programming project don’t the first time through), take a look at the notes on debugging in the timer article.
Don’t forget to download the “Free Contact Manager Database” with an example of this and other projects. Use the form in the sidebar or visit the Inspired Business Suite webpage. (If you are already a member of the Inspired FileMaker Business e-newsletter, check your email for a link to the new contact manager.)
What Else Is Possible?
In the next article, we’ll do something a little more fun, and challenging, and perhaps more practical: an internal instant messaging system. This project is considerably more complex, but most of the complexity lies in FileMaker Pro development, rather than HTML and JavaScript. Arguably, the project could be accomplished exclusively with native FileMaker Pro tools, but I find it to be much more responsive, robust and dynamic when using Web Viewers.
Debugging
Take a look at the debugging section of the Timer article where I discuss debugging web viewers with data URIs. And of course, if you are still stuck or you have any questions or comments, feel free to post a comment below or contact me directly.

2 Comments